Transform Your Concrete with Ease: My Expert Experience Using a Concrete Lifting Foam Kit
As a homeowner, I know how frustrating it can be to deal with uneven surfaces and sinking concrete. It’s not just an eyesore; it can pose safety risks and diminish the value of my property. That’s when I discovered the revolutionary solution known as the Concrete Lifting Foam Kit. This innovative product has transformed the way I approach concrete repair, offering a quick, efficient, and cost-effective method to restore my surfaces to their original glory. With its easy application and impressive results, the Concrete Lifting Foam Kit has become my go-to tool for tackling those pesky concrete issues. Join me as I explore the benefits and functionalities of this game-changing solution, and discover how it can help you reclaim your outdoor spaces and enhance the beauty of your home.
I Personally Tried The Concrete Lifting Foam Kit And Here Are My Honest Recommendations
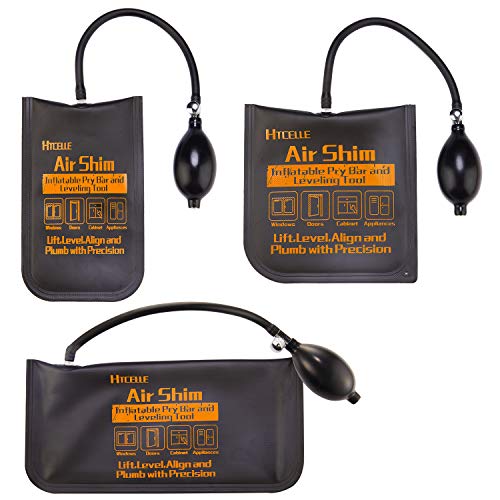
Air Wedge Bag,HTCELLE 3 Piece Commercial Grade Air Wedge Bag Pump Professional Leveling Kit & Alignment Tool Inflatable Air Wedge for a Variety of Jobs,Sizes/Small/Medium/Large.

Loctite Tite Foam Big Gaps Spray Foam Sealant, Polyurethane Expanding Insulation – 12 fl oz Can, Pack of 1

6 Lb. Density Expanding Pour Foam, 2 Part Polyurethane Closed Cell Liquid Foam for Boats, Dock Flotation, Carving, Soundproofing, Filling Voids, and Insulation (1 Gallon Kit)

Spray Foam Insulation Kit DIY Closed Cell Spray Polyurethane Expanding Foam Sealant for Walls, Attic & Concrete, Heat (Thermal) & Acoustic Insulating, 240 Board Feet (Gun & Cleaner Included, 12 Pack)
1. Air Wedge Bag,HTCELLE 3 Piece Commercial Grade Air Wedge Bag Pump Professional Leveling Kit & Alignment Tool Inflatable Air Wedge for a Variety of Jobs,Sizes/Small/Medium/Large.
As someone who often engages in DIY projects or professional installations, I can’t express enough how beneficial the HTCELLE Air Wedge Bag Pump Professional Leveling Kit has been for me. This three-piece commercial-grade toolset is designed with precision and versatility in mind, making it an essential addition to my toolkit. The fact that it includes small, medium, and large bags means that I have the right size for any job I encounter, whether I’m aligning cabinets, leveling furniture, or adjusting pipes. The thoughtful design and robust features make it a practical choice for both professionals and hobbyists alike.
One of the standout features of the HTCELLE Air Wedge Bags is the upgraded material. With a 300-pound load rating and a thickness of 0.8mm, I have confidence in its durability. The two-sided coating made from TUP material ensures that both the interior and exterior of the wedge bag are tough enough to handle various tasks without risk of puncture or tear. Rounded corners and stiff, durable edges make insertion easy, and the smooth exterior prevents any damage to the surfaces I’m working with. It’s reassuring to know that I can rely on this tool during critical jobs, especially when dealing with expensive materials or delicate installations.
Another feature that I appreciate is the ease of operation. The air wedge bags are designed for one-handed inflation, which is a game-changer for solo installers like myself. With the ability to fit into tight gaps as small as 3/32 inches and a gap spanning capacity of 2-1/2 inches, the versatility is unparalleled. This means I can effectively use the air wedges in various scenarios without needing a second pair of hands. The 300-pound load rating gives me peace of mind, knowing that I can tackle full-size installations without the risk of damage.
Moreover, the HTCELLE air wedge bags provide great protection for materials. Unlike wooden wedges that can leave marks or cause scuffs, these inflatable cushions ensure a smooth and damage-free experience. This feature is particularly important when working with high-end finishes or delicate surfaces, making it an ideal tool for professionals who prioritize quality in their work. I can use these bags without worry, knowing they won’t mar the surfaces I’m working on.
Time and energy savings are crucial in any job, and the HTCELLE Air Wedge Bag Pump does not disappoint in this regard. It allows me to manage installations efficiently, even when I’m working alone. The ability to slide the wedge into gaps easily means that I can create space for the air gasket without any hassle. This not only saves me time but also reduces the physical strain of lifting and adjusting heavy objects. Whether I’m hanging cabinets or setting up complex systems, this tool significantly streamlines the process.
if you’re looking for a reliable, easy-to-use, and effective alignment tool, I highly recommend the HTCELLE Air Wedge Bag Pump Professional Leveling Kit. With its durable design, ease of use, and protective features, it has become an indispensable part of my toolkit. Investing in this air wedge bag kit is not just about making your job easier; it’s about ensuring quality and efficiency in your work. Don’t hesitate—make the smart choice and elevate your installation and leveling tasks with this fantastic tool!
Feature Description Material 300-pound load rating, 0.8mm thickness, TUP durable material Sizes Small, Medium, Large – suitable for various jobs Operation Easy one-handed inflation; fits into tight gaps (3/32 inch) Protection Will not damage or scuff surfaces; great replacement for wooden wedges Efficiency Greatly saves time and energy for solo installers
Get It From Amazon Now: Check Price on Amazon & FREE Returns
2. Loctite Tite Foam Big Gaps Spray Foam Sealant, Polyurethane Expanding Insulation – 12 fl oz Can, Pack of 1
I recently came across the Loctite Tite Foam Big Gaps Spray Foam Sealant, and I must say, I am genuinely impressed with its capabilities. If you’re anything like me, you probably have a few gaps or cracks around your home that need a little TLC. This product is specifically designed to tackle those larger gaps and is perfect for anyone looking to improve insulation and energy efficiency in their living space. With a 12 fl oz can, it’s compact yet powerful enough to handle multiple projects. This isn’t just a sealant; it’s a game changer for home improvement enthusiasts.
One of the standout features of the Loctite Tite Foam is its ability to expand to fill gaps and cracks up to 3 inches wide. I find this particularly useful when working on older homes or in areas where settling has occurred. This expanding foam fills spaces that traditional caulks simply can’t, ensuring that no space is left unsealed. Whether you’re working on windows, doors, or even around pipes, this product provides comprehensive coverage to prevent drafts and improve your home’s overall insulation.
The high-density foam formulation is another aspect that I really appreciate. It offers a uniform cell structure, which means that the foam remains durable and retains its insulating properties over time. This is crucial for anyone looking to undertake remodeling projects, as you want materials that will stand the test of time. The durability of the sealant means less frequent reapplications, ultimately saving you time and money in the long run.
What sets Loctite Tite Foam apart from other sealants is its superior flexibility. We all know that buildings can shift and settle, which can compromise a seal over time. However, this foam is designed to withstand such movements without losing its integrity. This feature gives me peace of mind, knowing that the areas I seal will remain protected, even in the face of environmental changes.
Moreover, the strong adhesion of this sealant is impressive. It bonds effectively to a wide range of building materials, including wood, concrete, brick, stone, metal, and PVC. This versatility means that I can use it in various applications throughout my home. No matter the material, I can trust that this foam will create a lasting seal, which is essential for preventing moisture intrusion and air leaks.
Lastly, the UV resistance is a must-have feature that I truly value. Exposure to harsh sunlight can deteriorate many products, but this foam is built to withstand those UV rays, ensuring long-lasting results. This is particularly important for outdoor applications, where I want to ensure that my sealant remains effective for years to come, regardless of the weather conditions.
the Loctite Tite Foam Big Gaps Spray Foam Sealant is an excellent choice for anyone looking to seal and insulate their home effectively. Its expansive filling capability, high-density formulation, superior flexibility, strong adhesion, and UV resistance make it a top contender in the market. If you’re ready to tackle those pesky gaps and improve your home’s energy efficiency, I highly recommend giving this product a try. Trust me, you won’t be disappointed!
Feature Description Expands To Fill Fills gaps and cracks up to 3 inches in size High Density Foam Offers durability and overall insulation Superior Flexibility Withstands movement without compromising seal Strong Adhesion Bonds to wood, concrete, brick, stone, metal, PVC, and more UV Resistance Withstands harsh UV rays for long-lasting results
Get It From Amazon Now: Check Price on Amazon & FREE Returns
3. 6 Lb. Density Expanding Pour Foam, 2 Part Polyurethane Closed Cell Liquid Foam for Boats, Dock Flotation, Carving, Soundproofing, Filling Voids, and Insulation (1 Gallon Kit)
As I delve into the details of the ‘6 Lb. Density Expanding Pour Foam’, I find it to be an incredibly versatile product that promises to meet a wide range of needs for both hobbyists and professionals alike. This two-part polyurethane closed cell liquid foam is designed to deliver exceptional performance in various applications, making it a valuable addition to anyone’s toolkit. Whether I’m looking to enhance flotation in boats, soundproof a space, or fill voids in a project, this foam is tailored to cater to those needs effectively.
One of the standout features of this foam is its 6LB density, which gives it remarkable buoyancy. When mixed in equal parts, I can create a lightweight yet highly effective flotation solution. The 1-gallon kit, consisting of ½ gallon of Part A and ½ gallon of Part B, produces a generous 1.5 cubic feet of foam. This means I can tackle larger projects without the need for frequent reordering, which is a significant advantage for anyone working on big tasks such as boat repairs or dock flotation enhancements.
Another impressive aspect is its versatility in application. Once fully cured, this foam can be laminated over with various types of resins, including polyester, epoxy, or vinyl ester, without the risk of melting. This feature is particularly beneficial for those who are into crafting or construction, as it allows me to integrate the foam seamlessly into more extensive projects without compromising quality. Furthermore, its utility extends to floating decoys and taxidermy, as well as sculpting and carving projects, showcasing its adaptability across different creative fields.
However, it’s essential to note that the expansion rates and curing times are temperature-sensitive. The ideal working temperature ranges from 75° to 80°F, and I should be mindful that temperatures below 75°F will lower the expansion rate, requiring more foam to achieve the desired results. This information is crucial for planning my projects effectively and ensuring that I have enough product on hand. The initial working time before foaming is approximately 45 seconds, and it takes about 5 minutes before full expansion occurs. Knowing this allows me to work efficiently and keep my projects on track.
In summary, the ‘6 Lb. Density Expanding Pour Foam’ is an excellent choice for those who need a reliable and versatile foam solution. Its buoyancy, ease of use, and compatibility with various materials make it an ideal option for a wide range of applications. Whether I’m a DIY enthusiast, a professional contractor, or an artist, this foam can significantly enhance my projects. If you’re considering a product that combines quality, versatility, and practicality, I highly recommend giving this expanding foam a try. It’s an investment that promises to deliver results and efficiency in your work.
Feature Description Product Type 2-Part Polyurethane Closed Cell Liquid Foam Density 6 LB Density Volume 1 Gallon Kit (1/2 Gallon Part A & 1/2 Gallon Part B) Expansion Volume Produces 1.5 cubic feet Curing Compatibility Can be laminated with polyester, epoxy, or vinyl ester resin Applications Flotation, Soundproofing, Insulation, Sculpting, Taxidermy Working Temperature Ideal 75° to 80°F; Below 75°F may reduce expansion Working Time Approx. 45 seconds before foaming Full Expansion Time Approx. 5 minutes
Get It From Amazon Now: Check Price on Amazon & FREE Returns
4. Spray Foam Insulation Kit DIY Closed Cell Spray Polyurethane Expanding Foam Sealant for Walls, Attic & Concrete, Heat (Thermal) & Acoustic Insulating, 240 Board Feet (Gun & Cleaner Included, 12 Pack)
As someone who values efficient home improvement solutions, I was intrigued by the Spray Foam Insulation Kit DIY Closed Cell Spray Polyurethane Expanding Foam Sealant. This product is specifically designed to provide insulation for walls, attics, and concrete, making it an excellent choice for enhancing energy efficiency in various settings. With 240 board feet of coverage and essential accessories included, I feel that this kit can significantly impact anyone looking to improve their home insulation.
The rapid setting time of GrizzlyGuard Quickcoat Polyurethane Spray Foam stands out to me. It establishes strong chemical bonds quickly, which minimizes the waiting period for my projects. While I understand that uneven surfaces or larger gaps may slow down the bonding process, the fact that it achieves full effectiveness within 24 hours is reassuring. I appreciate how this fast action can help me finish my projects sooner, allowing me to enjoy the benefits of insulation without extended delays.
Another impressive feature is the efficient application and durable adhesion. I love the idea that this foam can be easily painted over, enabling me to seamlessly integrate it into my home’s aesthetics. With two distinct nozzles included, I can choose the right tool for the job. Nozzle A is perfect for applying the foam on upright surfaces, while Nozzle B is designed for overhead spraying. This versatility allows me to tackle various projects without needing additional tools, making the process more efficient and user-friendly.
Moreover, the revolutionary formula of GrizzlyGuard Quickcoat Polyurethane Spray Foam really caught my attention. With a thermal resistance of 5.66 per inch and a heat insulation metric of 0.025 W/(m.k), it’s clear that this insulation is among the most advanced options available. Whether I’m a seasoned professional or a DIY enthusiast, this product’s high performance is appealing. It provides me with the assurance that I’m using a top-tier insulator that will effectively meet my needs.
Guidance on usage is another highlight that adds to my confidence in this product. Knowing the right distance to spray the foam—12-18 inches for walls and 6-8 inches for ceilings—ensures I can achieve the best results. The recommendation for applying a thicker layer to enhance insulative properties is particularly helpful. Additionally, the ability to pause and continue later by leaving the can connected to the spray gun is a practical feature that accommodates my project timeline.
What I find most appealing is the versatile application scope of the GrizzlyGuard Quickcoat. It’s compatible with a wide range of materials, including drywall, plaster, wood, concrete, and metal. This adaptability means I can use it not only for insulating buildings but also for enhancing vehicles and watercrafts. The wide range of applications allows me to maximize the use of this product, which is essential for any homeowner looking to improve various aspects of their property.
Overall, the GrizzlyGuard Quickcoat Spray Foam Insulation Kit seems like a fantastic investment for anyone looking to enhance their home’s energy efficiency and comfort. With its rapid setting time, durable adhesion, and versatile application, I feel confident that this product can meet a diverse set of insulation needs. If you’re considering a DIY insulation project, I encourage you to give this kit a try. It might just be the solution you’ve been searching for!
Feature Description Rapid Setting Time Establishes strong bonds quickly; full effectiveness in 24 hours. Efficient Application Easy to paint over, includes two nozzles for varied uses. Revolutionary Formula Thermal resistance of 5.66 per inch, superior insulation performance. Guidance on Usage Specific distances for application; can pause and continue. Versatile Application Scope Compatible with drywall, plaster, wood, concrete, and metal. Wide Range of Use Ideal for attics, walls, basements, and more.
Get It From Amazon Now: Check Price on Amazon & FREE Returns
Why a Concrete Lifting Foam Kit Helped Me
As a homeowner, I always strive to maintain my property and ensure it remains safe and aesthetically pleasing. When I noticed some uneven concrete slabs in my driveway, I was initially overwhelmed by the thought of the repairs. That’s when I discovered a concrete lifting foam kit, and it truly transformed my experience.
Using the kit was surprisingly simple and efficient. I was able to lift the sunken concrete without the need for heavy machinery or extensive labor. The foam expands and fills voids beneath the concrete, effectively raising it to its original level. I felt empowered knowing I could tackle this issue myself, saving both time and money compared to hiring a contractor.
Not only did the lifting process restore the appearance of my driveway, but it also improved safety. The uneven slabs were a tripping hazard, and addressing this issue with the foam kit gave me peace of mind. I could now enjoy my outdoor space without worrying about accidents. Overall, investing in a concrete lifting foam kit was one of the best decisions I made for my home, providing me with a practical solution that I could execute with confidence.
Buying Guide for Concrete Lifting Foam Kit
Understanding Concrete Lifting Foam Kits
When I first encountered concrete lifting foam kits, I was intrigued by how they could effectively raise and stabilize sunken concrete slabs. These kits typically consist of a two-part polyurethane foam that expands and hardens when injected beneath the concrete. I realized that they are designed for both residential and commercial applications, making them a versatile choice for various projects.
Assessing My Concrete Issues
Before diving into a purchase, I took the time to assess the specific issues with my concrete surfaces. I noted any visible cracks, uneven areas, or sinking slabs. Understanding the extent of the problem helped me determine the appropriate size and type of foam kit I would need. I learned that not all foam kits are suitable for every situation, so a careful evaluation was crucial.
Choosing the Right Foam Type
I discovered that there are different types of foam available in the market. Some are designed for heavy-duty applications, while others cater to lighter residential needs. It was important for me to choose a foam that could support the weight of the concrete and any structures above it. I considered factors like load-bearing capacity and expansion properties.
Evaluating Kit Components
As I researched various kits, I noticed that they come with different components. A typical kit includes foam resin, a mixing nozzle, and an injection gun. I made sure to check if the kit had all the necessary tools for a complete lifting process. Having the right equipment would save me time and ensure a smoother application.
Considering Coverage Area
One of the crucial aspects I considered was the coverage area of the foam kit. I measured the areas I planned to lift and stabilized to ensure that I purchased a kit with adequate volume. I learned that some kits cover larger areas than others, so I wanted to avoid running out of foam midway through my project.
Evaluating Ease of Use
Since I was new to DIY projects involving foam, I looked for kits that were user-friendly. I appreciated kits with clear instructions and straightforward application processes. Some kits even offer pre-mixed options, which seemed like a great way to simplify the project for someone like me.
Checking for Safety Features
Safety was a significant concern for me when selecting a concrete lifting foam kit. I ensured that the foam had low toxicity and was safe to use indoors and outdoors. I also looked for kits that included safety gear, such as gloves and goggles, to protect myself during the application process.
Reading Customer Reviews
Before making my final decision, I spent time reading customer reviews and testimonials. I wanted to know about other users’ experiences with specific kits. Their insights helped me gauge the effectiveness and reliability of different foam kits, and I found it beneficial to learn from their successes and challenges.
Considering Budget and Value
Lastly, I had to consider my budget. I found that concrete lifting foam kits can vary significantly in price. While I wanted a quality product, I also needed to ensure that it fit within my budget. I focused on finding a kit that offered good value without compromising on essential features.
Making My Purchase
After thorough research and consideration of all these factors, I felt confident in my ability to choose the right concrete lifting foam kit. By following this guide, I was able to make an informed decision that ultimately led to a successful concrete lifting project.
Author Profile
-
My name is Gregory Abril, and my path to Chew N Play has been anything but ordinary. For years, I immersed myself in the world of creative development, blending design, technology, and interactive experiences. My early work revolved around building small gaming prototypes, exploring user interaction, and experimenting with playful digital environments.
By 2025, I felt a shift in my passion. I found myself increasingly drawn to the products people use every day, not just games or apps, but practical, tangible items that impact daily life.
Latest entries
- June 22, 2025Personal RecommendationsMy Top Picks: The Best Waterproof Cases for the S24 Ultra Based on Personal Experience
- June 22, 2025Personal RecommendationsWhy Upgrading My Walk-In Cooler Door Gasket Transformed My Business: An Expert’s Insight
- June 22, 2025Personal RecommendationsUnlocking Creativity: My Personal Journey with the Nikon Coolpix S800C Digital Camera
- June 22, 2025Personal RecommendationsWhy I Can’t Get Enough of Hooded Short Sleeve Shirts: My Expert Take on Style and Comfort